Serverless Web Apps using Amazon DynamoDB
Build a mission dossier generator using DynamoDB by creating a DynamoDB table and add data, and then review the necessary IAM roles and policies that you will use to grant secure access to this data. Once you are done with it you will create Lambda functions that interact with DynamoDB and retrieve data in several different ways, then you will build an API through the API Gateway service and setting up a public website to retrieve information from your DynamoDB table via Lambda Functions. Finally, you will be able to generate mission dossiers.
By the end of this exercise, you will be able to:
Estimated Duration: 170 minutes.
Execution
AWS Console
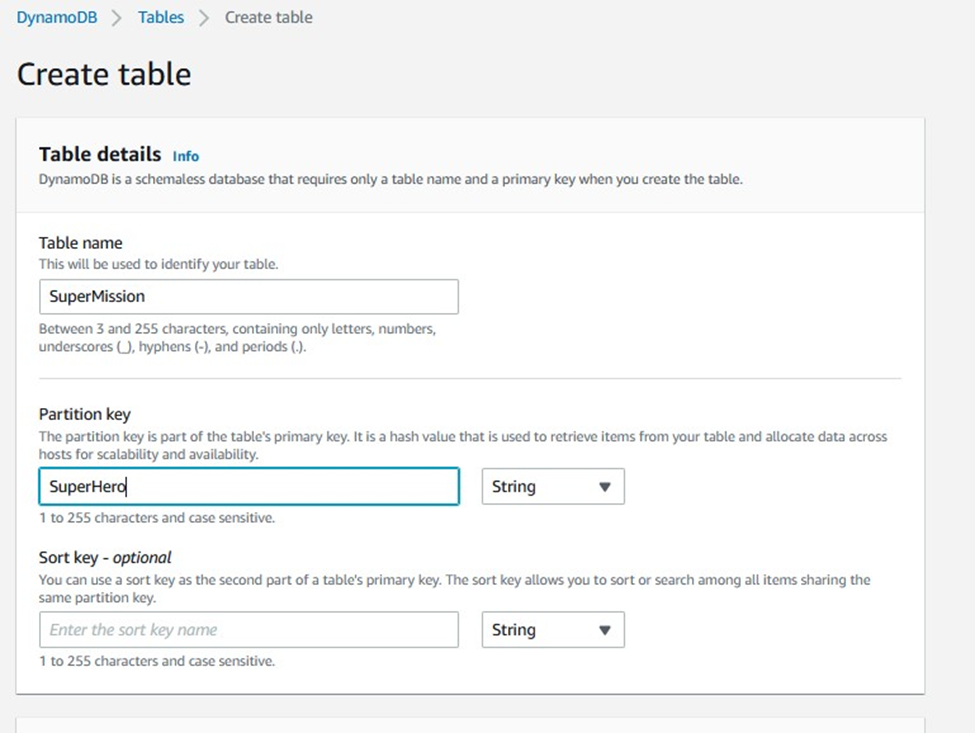
You will use the default settings to create the table.

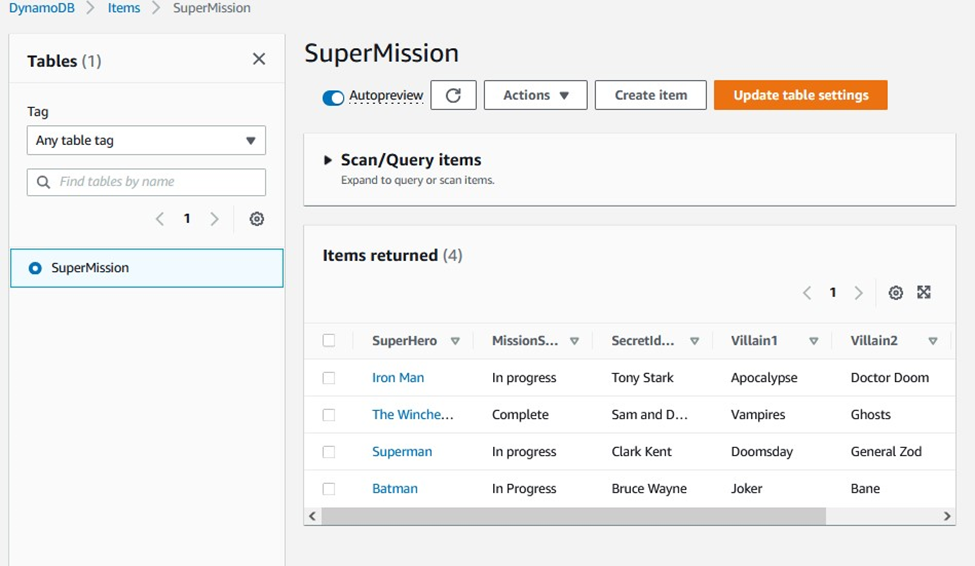
The table will only take a few seconds to create. If your browser takes longer than this, click Cancel and refresh the web page. Your table should appear.
In this task, you will add items to the table using the Tree method
The first Attribute name field is already populated for you with SuperHero.
|
Attribute name |
Value |
|
SuperHero (already populated for you) |
Batman |
|
MissionStatus |
In Progress |
|
Villain1 |
Joker |
|
Villain2 |
Bane |
|
Villain3 |
Ras Al Ghul |
|
SecretIdentity |
Bruce Wayne |
When you finish, your item should look like:

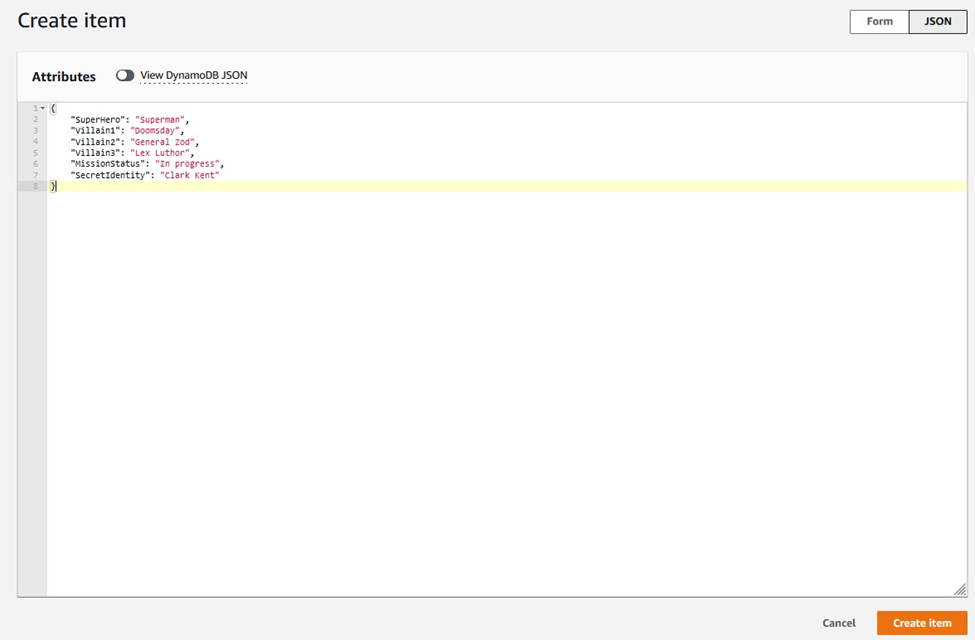
In this task, you will add an item as JSON
{
"SuperHero": "Superman",
"Villain1": "Doomsday",
"Villain2": "General Zod",
"Villain3": "Lex Luthor",
"MissionStatus": "In progress",
"SecretIdentity": "Clark Kent"
}
Third item:
{
"SuperHero": "The Winchester Brothers",
"Villain1": "Vampires",
"Villain2": "Ghosts",
"Villain3": "Werewolves",
"MissionStatus": "Complete",
"SecretIdentity": "Sam and Dean"
}
Fourth item:
{
"SuperHero": "Iron Man",
"Villain1": "Apocalypse",
"Villain2": "Doctor Doom",
"Villain3": "Loki",
"MissionStatus": "In progress",
"SecretIdentity": "Tony Stark"
}
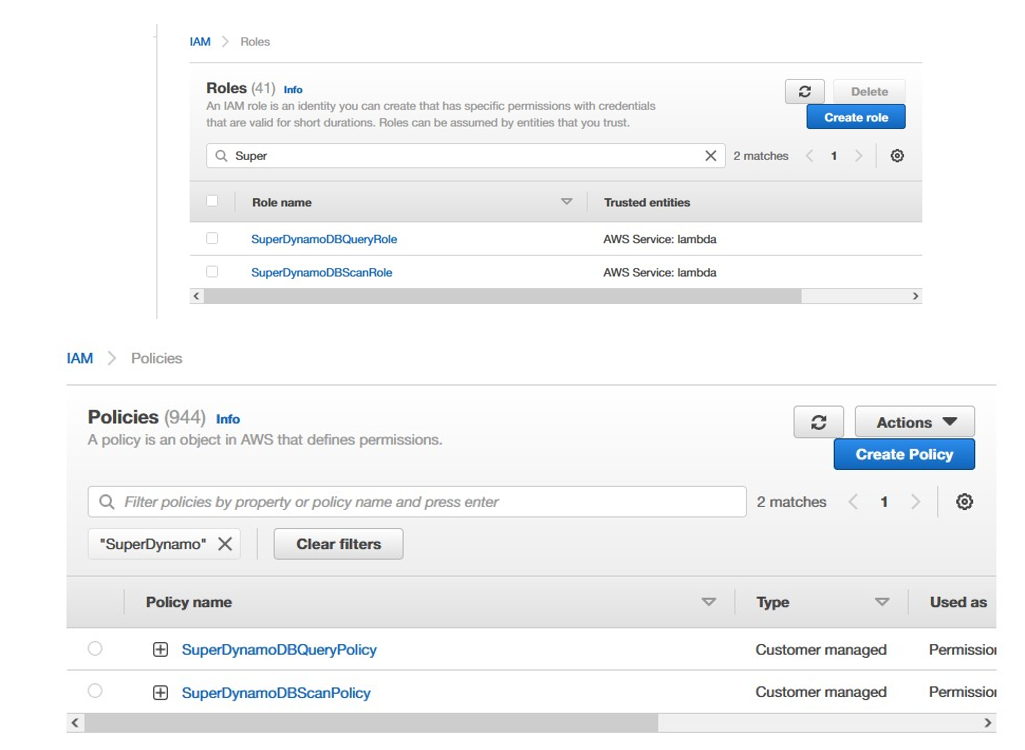
In this task you will review the two IAM policies that will be used to access your data in the next part of this challenge.
{
"Version": "2012-10-17",
"Statement": [
{
"Action": [
"dynamodb:Scan",
"s3:GetObject",
"s3:PutObject",
"dynamodb:BatchWriteItem"
],
"Resource": [
"*"
],
"Effect": "Allow"
}
]
}
This is a simple policy that grants access to the Scan, BatchWriteItem APIs under DynamoDB and GetObject, PutObject APIs under S3 in your account.
{
"Version": "2012-10-17",
"Statement": [
{
"Condition": {
"ForAllValues:StringEquals": {
"dynamodb:Attributes": [
"SuperHero",
"MissionStatus",
"Villain1",
"Villain2",
"Villain3"
]
}
},
"Action": [
"dynamodb:Query"
],
"Resource": "*",
"Effect": "Allow"
}
]
}
This policy allows the user or entity that assumes the role to perform a Query operation, but only against the specified attributes. This powerful feature enables you to implement column-level security on your DynamoDB tables.
|
|
|
|
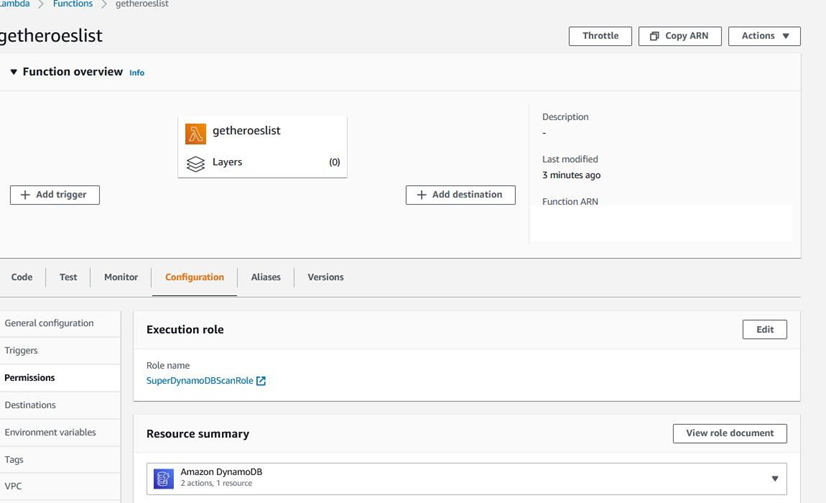
In this task, you will create two Lambda functions. The first will retrieve a list of superheroes that are stored in the SuperMission DynamoDB table. The second will retrieve the mission details from the same DynamoDB table.
|
var doc = require('aws-sdk'); var dynamo = new doc.DynamoDB();
exports.handler = function(event, context) { var getParams = { TableName:'SuperMission' };
dynamo.scan(getParams, function(err, data){ if (err) console.log(err, err.stack); // an error occurred else { context.succeed(data); } }); }; |
This function retrieves a list of superheroes stored in the SuperMission DynamoDB table.
Removing {} will result in error: There is an error in your JSON event. Correct it before saving.
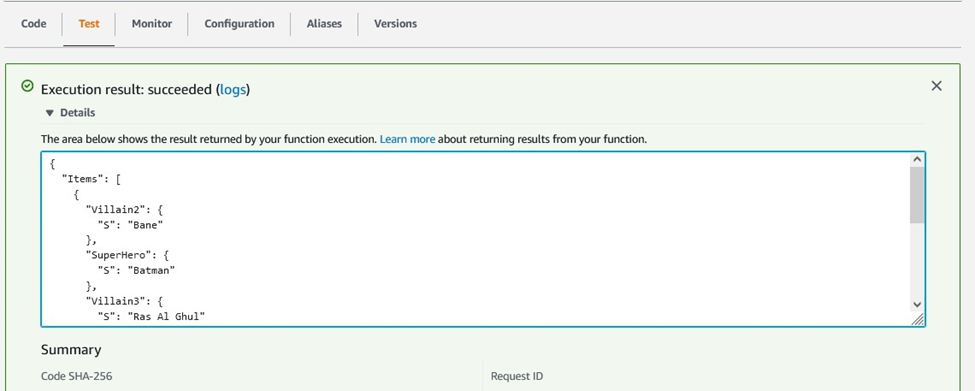
You will see a message telling you that Execution Result: Succeeded.
You will see a text box displaying the contents of the SuperMission DynamoDB table.

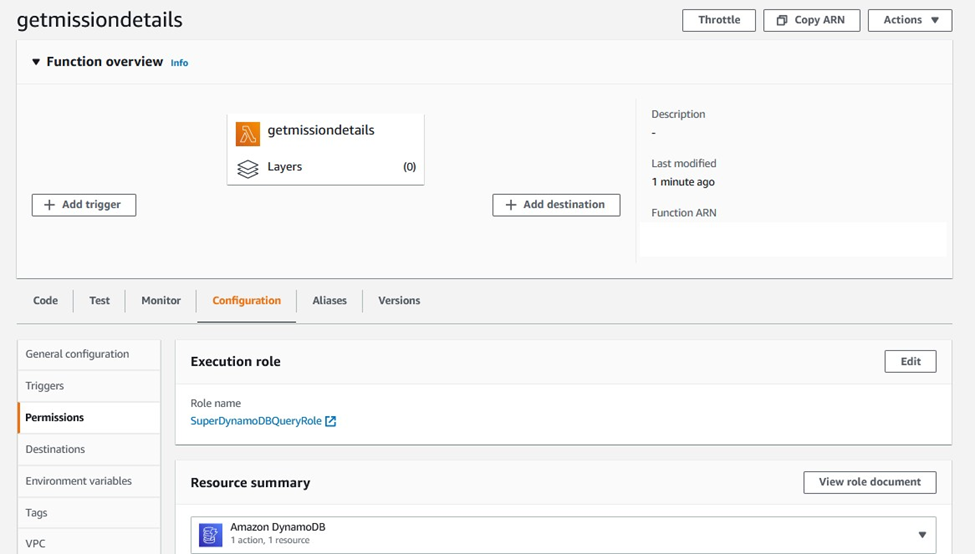
Next, you will create a second Lambda function to retrieve the mission details from the SuperMission DynamoDB table.
|
var doc = require('aws-sdk'); var dynamo = new doc.DynamoDB();
exports.handler = function(event, context) { var condition = {}; condition["SuperHero"] = { ComparisonOperator: 'EQ', AttributeValueList:[{S: event.superhero}] }
var getParams = { TableName:'SuperMission', ProjectionExpression:"SuperHero, MissionStatus, Villain1, Villain2, Villain3", KeyConditions: condition }; |
dynamo.query(getParams, function(err, data){ if (err) console.log(err, err.stack); // an error occurred else { context.succeed(data);
}
});
};
This function retrieves the mission details from DynamoDB table.
• Name: myTest2
This code looks for details of Batman’s mission in the DynamoDB table.
{
"superhero": "Batman"
}
You will see a message telling you that Execution Result: Succeeded. Below that, there will be a text box displaying the mission details for “Batman”.
You will see a text box displaying the contents of the SuperMission DynamoDB table.
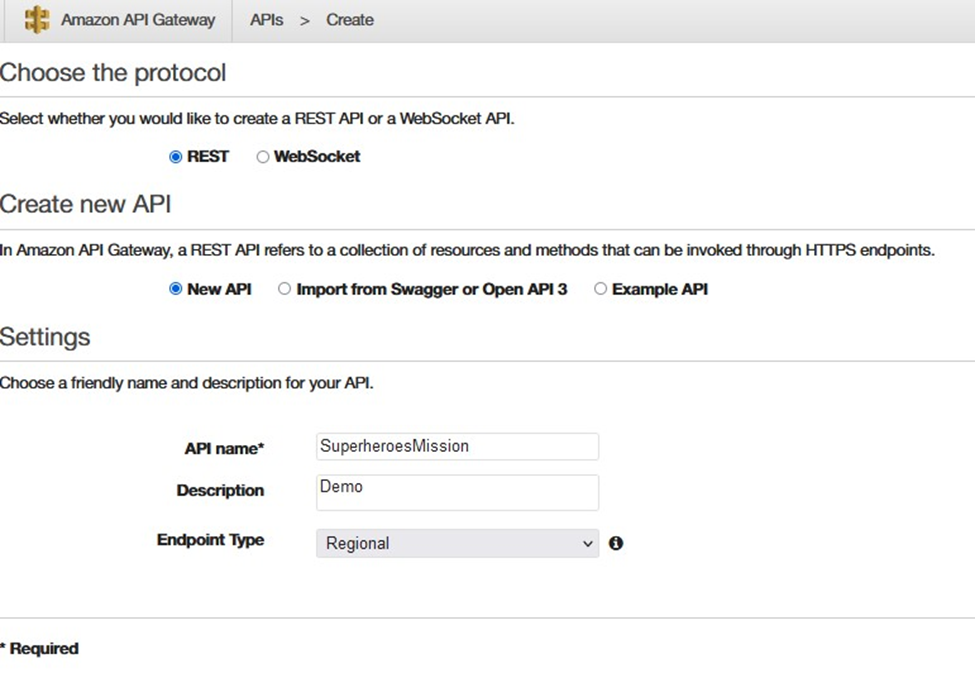
In this task, you will learn how to create and configure a new API. Amazon API Gateway helps developers to create and manage APIs to back-end systems running on Amazon EC2, AWS Lambda, or any publicfacing web service. You will create and configure an API to connect your DynamoDB table to your Lambda functions.
This example API is prepopulated for you by AWS. It is a good reference if you are new to working with Amazon API Gateway, but you will not use this example for your lab.
You will see what looks like a file explorer.
This is the root of the folder.
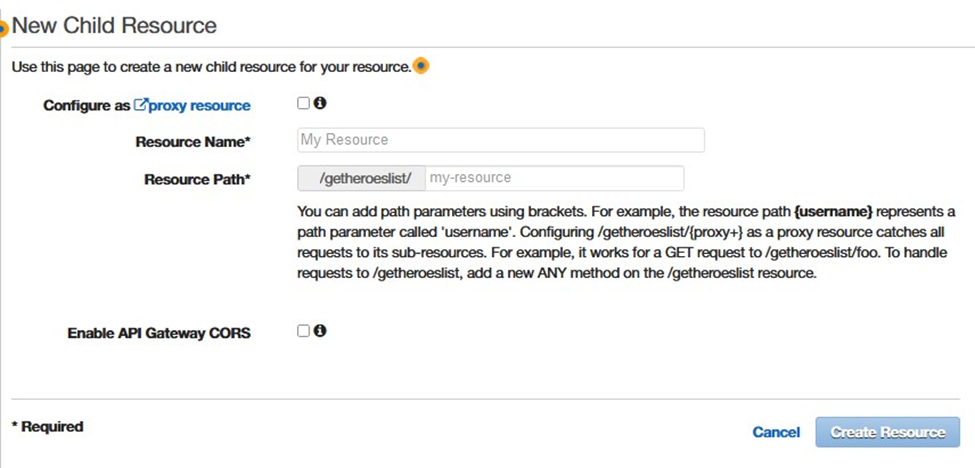
Next you will create another child resource.

Next you will create the method to call the Lambda functions you created. Recall that the Lambda functions pull mission data from the DynamoDB table in several different ways.
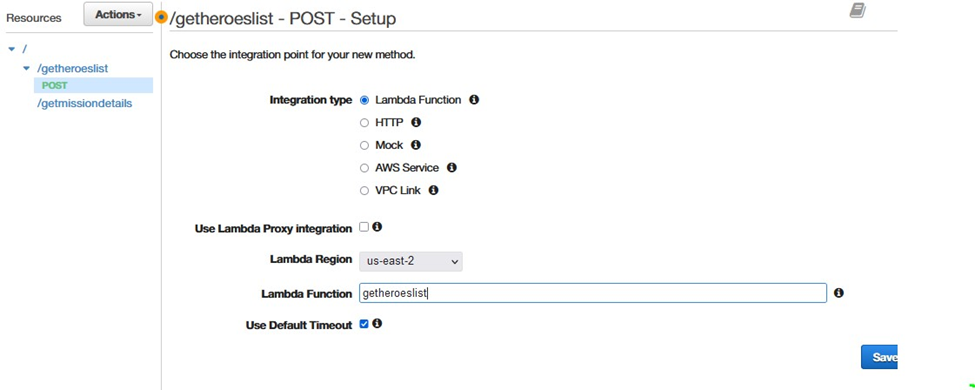
Next you will set up your method.
In the Post – Setup window, configure:
You will see a warning that you are about to give the API Gateway service permission to invoke your Lambda function.
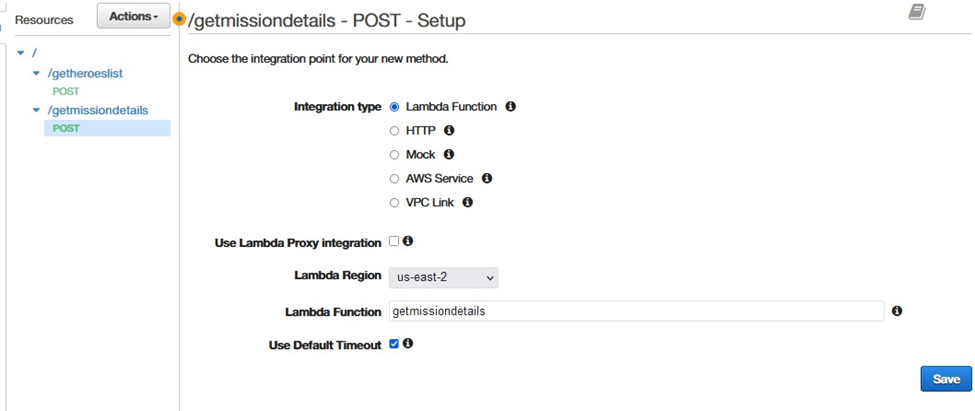
In the Post – Setup windows, configure:
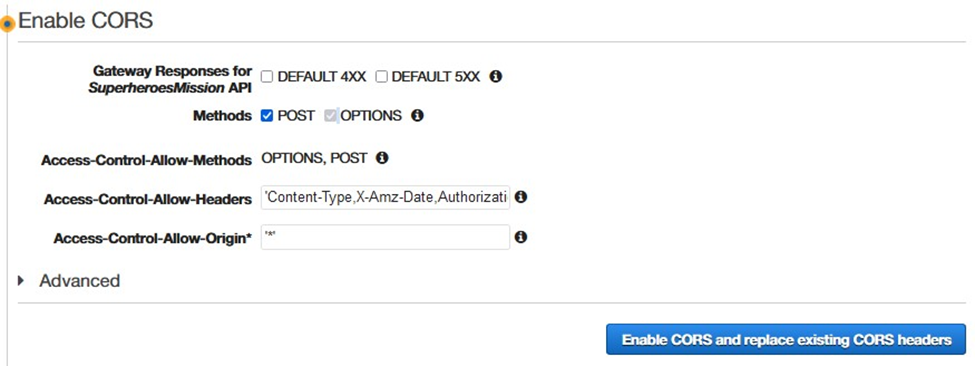
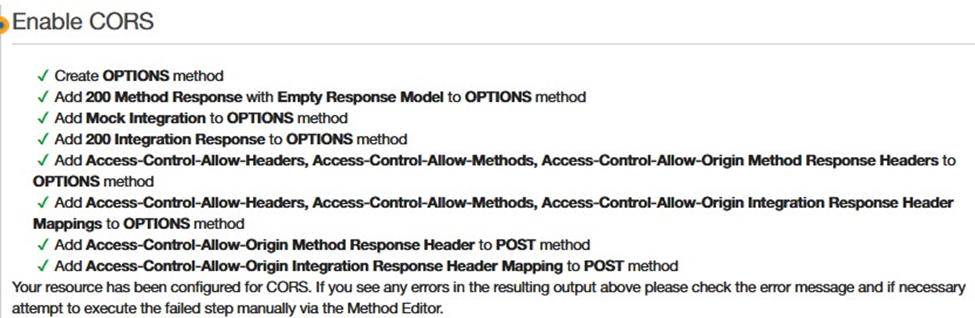
Next, you will enable CORS for the methods you just created in the API Gateway. Cross-Origin Resource Sharing (CORS) allows browser to make HTTP request to servers with a different domain/origin.
Repeat the same process for getmissiondetails resource.
• Deployment stage: New Stage • Stage name: Demo1 • Click Deploy.
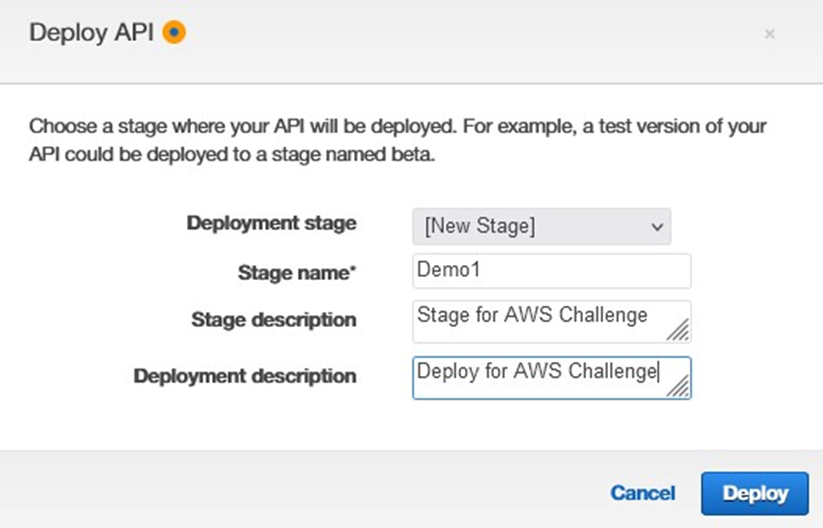
You have deployed the API.
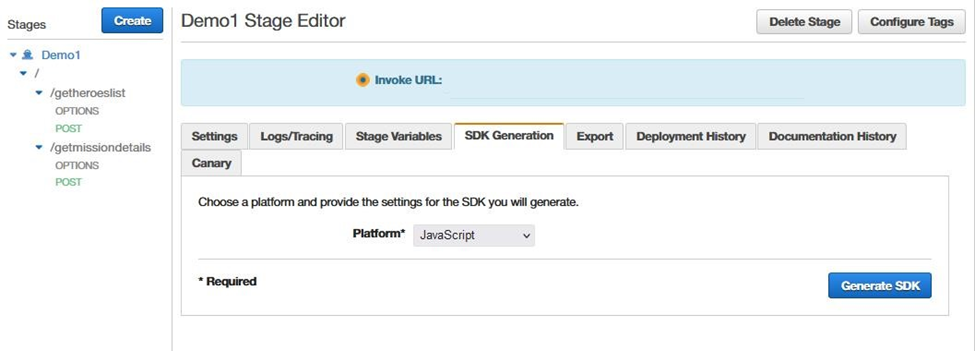
In this task, you will generate the SDK for your API. After deploying the API, you will be redirected to the Demo1 Stage Editor.
Next, you will retrieve an HTML page that you will use to test your API.
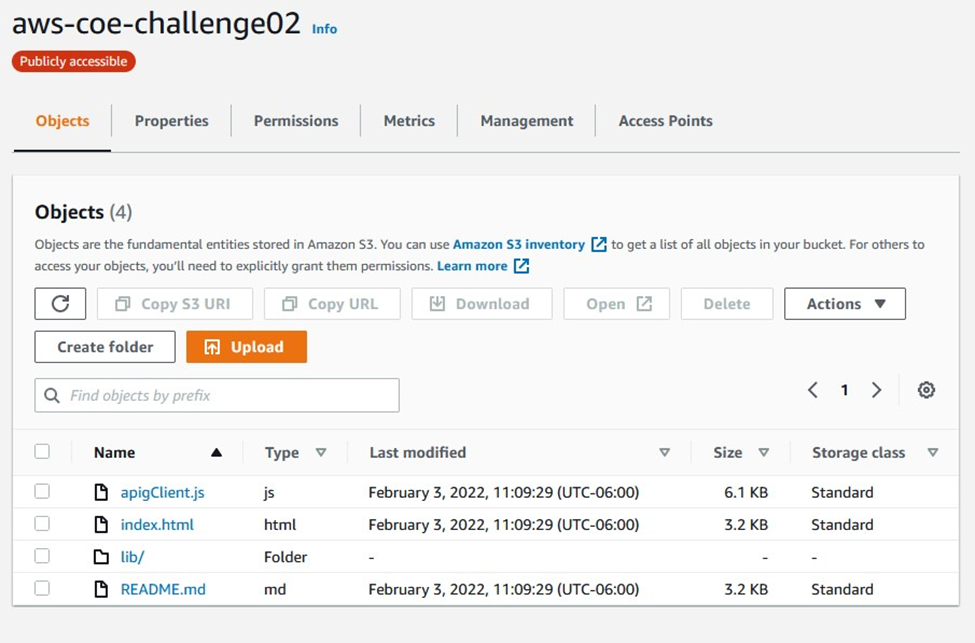
Recall that you downloaded the ZIP file and extracted the contents to your local computer in the previous steps.
<!DOCTYPE html>
<html lang="ja"><head>
<meta http-equiv="content-type" content="text/html; charset=windows-1252">
<script type="text/javascript" src="lib/axios/dist/axios.standalone.js"></script>
<script type="text/javascript" src="lib/CryptoJS/rollups/hmac-sha256.js"></script>
<script type="text/javascript" src="lib/CryptoJS/rollups/sha256.js"></script>
<script type="text/javascript" src="lib/CryptoJS/components/hmac.js"></script>
<script type="text/javascript" src="lib/CryptoJS/components/enc-base64.js"></script>
<script type="text/javascript" src="lib/url-template/url-template.js"></script>
<script type="text/javascript" src="lib/apiGatewayCore/sigV4Client.js"></script>
<script type="text/javascript" src="lib/apiGatewayCore/apiGatewayClient.js"></script>
<script type="text/javascript" src="lib/apiGatewayCore/simpleHttpClient.js"></script>
|
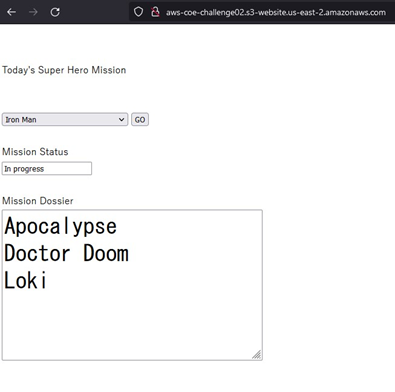
<script type="text/javascript" src="lib/apiGatewayCore/utils.js"></script> <script type="text/javascript" src="apigClient.js"> </script> </head> <body> <form id="callapigateway" name="callapigateway"> <br><br> <label for="superHero">Today's Super Hero Mission</label><br> <br><br> <select id="superheroname"> <option selected="selected">What's your Super Hero name?</option> </select> <!-- Will be populated later-->
<button type="button" value="inputsbutton" onclick="callapigw()">GO</button> <br><br> <label for="superHero">Mission Status</label> <br><input type="text" length="50" name="missionstatus" id="missionstatus" placeholder="Current Mission status"> <br><br> <label for="superHero">Mission Dossier</label> <br><textarea style="font-size: 28pt" cols="20" rows="5" name="List for today" id="missiondossier"></textarea>
</form> <script type="text/javascript"> var apigClient = apigClientFactory.newClient();
apigClient.getheroeslistPost({}, {}) .then(function(result){ var items = result.data.Items;
|
|
console.log(items); var x = document.getElementById("superheroname"); for (var i = 0; i < items.length; i++){ var option = document.createElement("option"); option.text = items[i].SuperHero.S; x.add(option); //option.value = items[i].SuperHero.S; //select.appendChild(option); } }).catch( function(result){ //This is where you would put an error callback });
function callapigw() { var apigClient = apigClientFactory.newClient(); var x = document.getElementById("superheroname"); var iSuperHero = x.options[x.selectedIndex].value;
if (iSuperHero == null || iSuperHero == "") {return false;} var body = "{\"superhero\":\"" + iSuperHero + "\"}"; apigClient.getmissiondetailsPost({}, body, {}) .then(function(result){ var dataoutput = result.data.Items[0]; console.log(dataoutput); document.getElementById("missionstatus").value = dataoutput.MissionStatus.S document.getElementById("missiondossier").value = dataoutput.Villain1.S + "\n" + dataoutput.Villain2.S + "\n" + dataoutput.Villain3.S + "\n"; }).catch( function(result){ document.write(result); }); } </script> </body></html> |
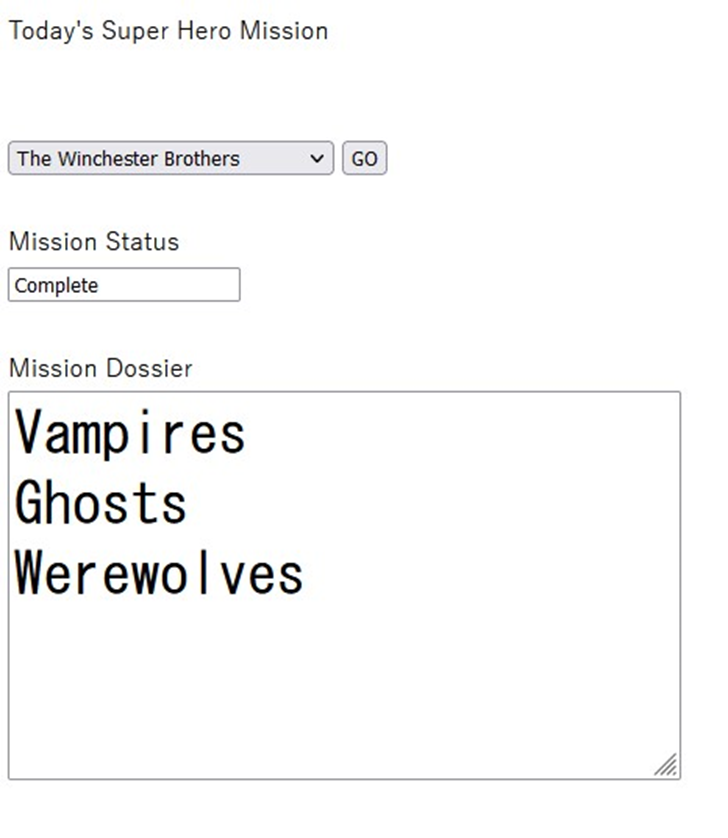
You will notice that the drop-down list uses the API Gateway resource getheroeslist to invoke the getheroeslistFunction Lambda function.
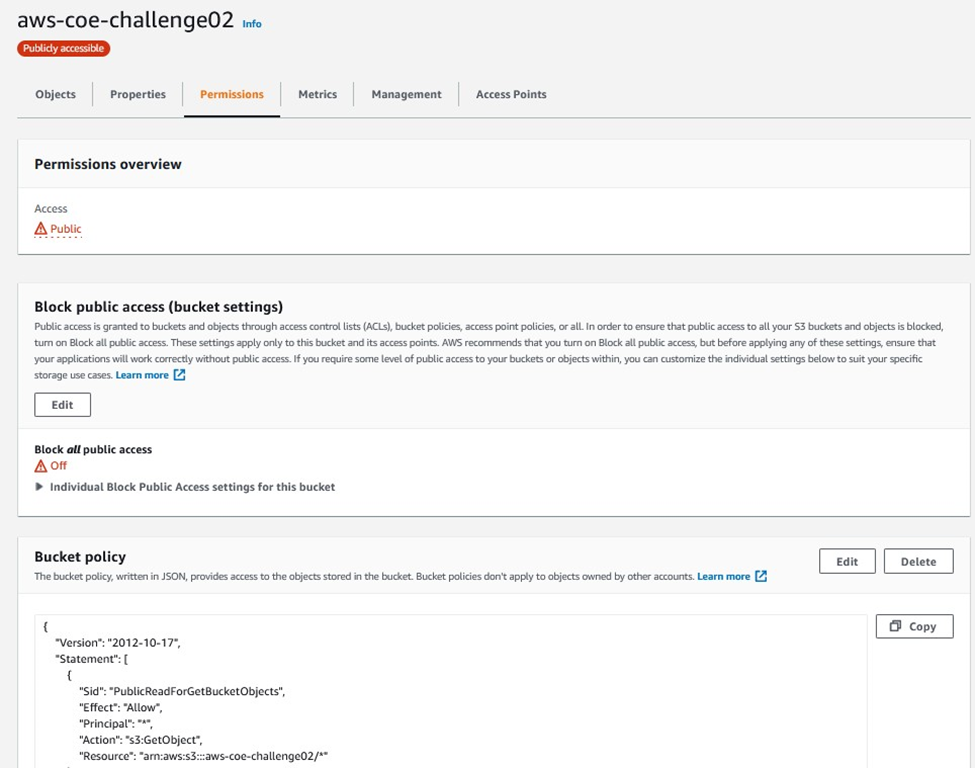
{
"Version": "2012-10-17",
"Statement": [
{
"Sid": "PublicReadForGetBucketObjects",
"Effect": "Allow",
"Principal": "*",
"Action": "s3:GetObject",
"Resource": "arn:aws:s3:::BUCKET/*"
}
]
}
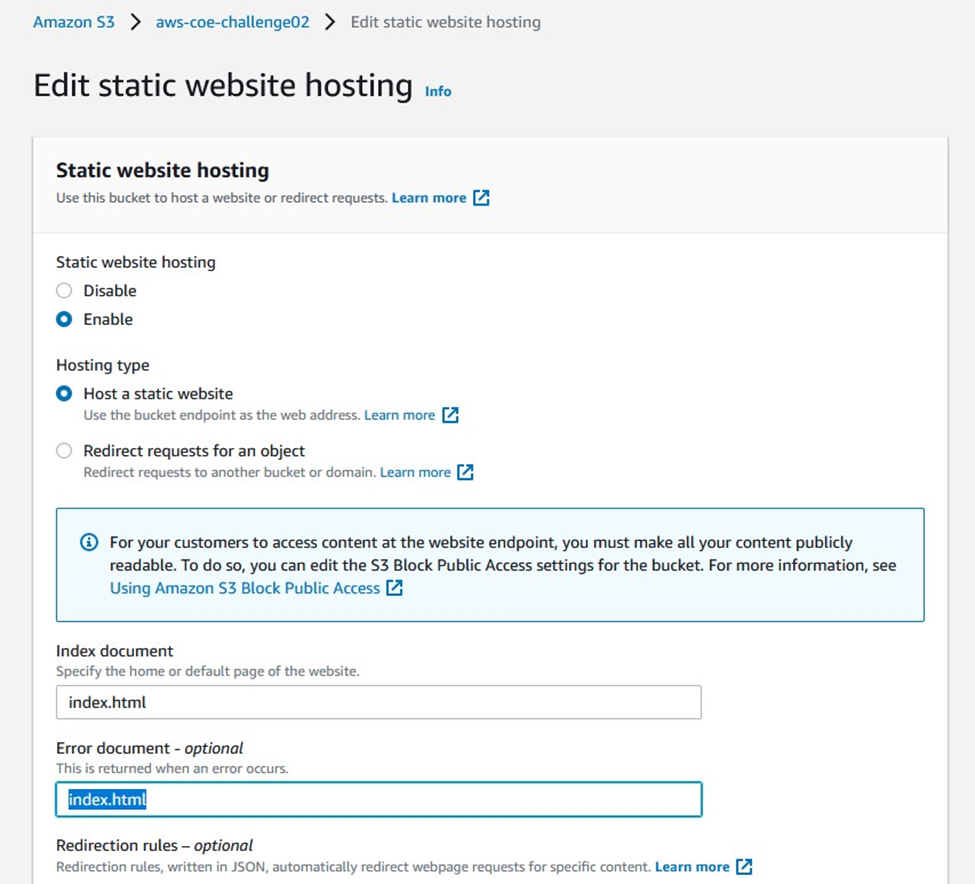
• Select Enable Static website hosting
Note – We have used the same document for both Index and Error, as some browsers display their own error message when an error occurs, ignoring the error document that Amazon S3 returns. For example, when an HTTP 404 Not Found error occurs, Google Chrome might ignore the error document that Amazon S3 returns and displays its own error.
What’s next?
Remember to delete:
References:
(http://docs.aws.amazon.com/lambda/latest/dg/welcome.html)
(https://docs.aws.amazon.com/iam/index.html)
(https://docs.aws.amazon.com/apigateway/latest/developerguide/welcome.html)